If you work with us or follow our blog, you know that we’re highly motivated by data and efficiency. Our appetite for data makes us partial to Google Tags, and our appreciation of efficiency draws us to Google Tag Manager: A free tool that makes complex data tracking easy to manage; bringing all of your code, tags and triggers in one place for simple and effective tag management.
Note: Google Tag Manager can be used for both websites and mobile applications; for the sake of simplicity, we’ll refer only to websites.
What Is Google Tag Manager?
Google Tag Manager is a free tool that allows marketers to implement and make tracking changes to a website without needing to hire a web developer. Before tag management software, developers would have to hard-code ‘tags’, or snippets of code, individually. Whenever marketers wanted to make the slightest change to website tracking, they couldn’t do so without needing to team up with a developer to make the necessary alterations on every single page of their website.
When you use a 3rd-party tracking program to collect information, such as Google Analytics, each program requires its own individual code. If you have a webpage that tracks information using three different programs, you would need three separate codes on each page of that site. With Google Tag Manager, you’re given one standardized code to place on your web page. All programs can then be deployed through that one GTM code and managed behind the scenes on a simple dashboard. As the needs of your website change, new programs and program updates can be made through the Google Tag Manager dashboard, without ever having to dive into the code on the web pages themselves.
What Are The Benefits of Google Tag Manager?

Manually wading through code is a tedious and time-consuming process to manage that can lead to delayed campaigns, which can have a negative impact on your marketing. Because of Google Tag Manager, when marketing strategies and goals change on a website, any updates that need to be made can be done on one easy-to-use, centralized interface. This simplifies the process, saving time, money, and resources throughout the lifespan of the website.
Another benefit of Google Tag Manager is that it allows you to test and debug any changes that you make before posting the changes live on your website. After the changes have been tested and perfected, Google Tag Manager makes it possible to implement all changes at the same time, ensuring efficient, more exact, and immediate tracking capabilities, ultimately giving you clean data.
For a great step-by-step description of how to set up Google Tag Manager on your site, this blog provides a great tutorial with screen shots.
The Components of Google Tag Manager
Google tag manager consists of a few parts:
- Accounts
- Containers
- Folders
- Tags
- Triggers
Accounts
An account is the top level of Google Tag Manager. Typically only one account is needed per company. Accounts can include a company or organization with lots of websites (such as a retail chain with different websites for each location), down to a small local company with only one site.
If you manage several non-related websites, you can create additional accounts once you’ve logged into your existing account.
It’s easy to set up a Google Tag Manager account on your website, especially if you already have a Google Analytics account (you can use the same login). Even if you don’t have a Google Analytics account, you can set up a new account for Google Tag Manager. Despite the common misconception, the two programs can work independently of one another, and you don’t need one to be able to use the other.
Containers
Once you’ve created your account and agreed to the terms and conditions, you’ll be given a new account with a container. Containers hold all the tags for a specific website or mobile application. If you only have one website, you’ll only need one container. If you have multiple related websites (such as various retail locations), you can create different containers for each.
Containers are the most important function of Google Tag Manager. They are the bucket where all your tags live. Containers keep all your important tags and programs in one organized container; allowing you to manage, configure, and deploy your programs and tags through one platform. Containers hold everything for a website. This is the function that allows you to run all of these on one platform, providing accessibility, convenience, and cost-effective tag management.
Pro tip: To stay organized, label your container after the website it represents. Be as specific as you need to be when you label in order to differentiate each container.
Folders

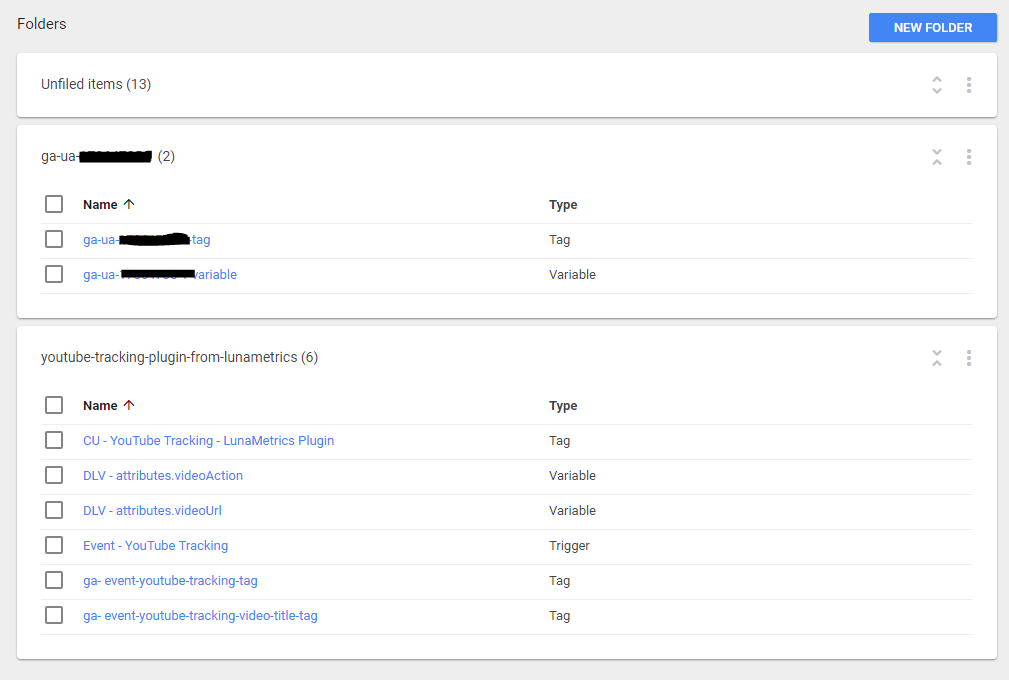
As containers grow, they can fill up and make it difficult to feel organized and keep track of all the jumbled components. Just like you do with files on your computer or with paper on your desk, you can use folders to organize the contents of your containers into groupings.
Here’s what a folder looks like when you set it up on Google Tag Manager.

A folder is an especially great tool if you have different teams working on different campaigns. You can label the folders by teams (ex. marketing vs. sales), by type (ex. Google Analytics tags vs. Google Ads [previously Google AdWords] tags), or by project (ex. new ad campaign, retargeting campaign). The capabilities of Google Tag Manager are vast, and folders can help you stay organized as you build your containers.
Tags

The goal of a tag is to give marketers a better understanding of what visitors are doing on their website. In order to track activity, you need a snippet of code on every page of your website. This section of code that allows for information tracking is called a tag. When a tag gets added to a web page, it permits tracking on that page, enabling data collection and reporting. Based on a user’s commands, a tag can tell you specific, detailed information about performance on that page.
Tags can track all types of information about a web page, such as conversions, traffic, button clicks, or other metrics needed to optimize online performance. They also enable detailed tracking, analyzing, and reporting, giving marketers real data on which to base their marketing decisions.
What Are Tags Used For?
Here are a couple examples of how Google Tags may be used on a site:
- For retargeting after a visitor performs a defined action (like landing on the sales page).
- To know what page a visitor is on when they perform a specific action – like signing up for the newsletter or downloading a free download.
- To gather detailed traffic information, such as visits to a particular webpage.
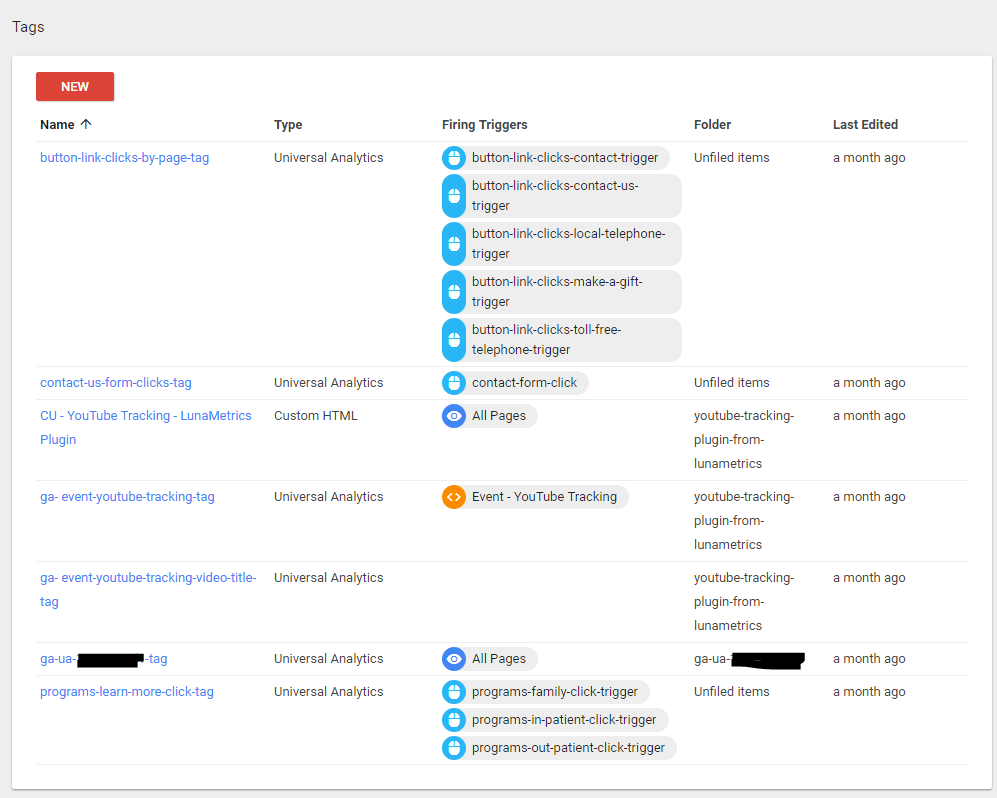
Here’s what it looks like when you set a tag up on Google Tag Manager.

To add tags, first, click on the desired container. Go to the tags section, and click on the New Tag button. Google provides templates for its programs, commonly used tags, and third party programs, and allows you to add custom tags as well.
Some common tags support tools like:
- Google Analytics
- Google Ads Conversion Tracking
- DoubleClick Floodlight Counter
- Custom Image Tags.
Tags are not Google-specific; Google Tag manager can be used with any tag, including Facebook, LinkedIn, Mouseflow, Twitter, and Bing.
For more information, see this Google Tag Manager list of supported tags.
Triggers
When a trigger is attached to a tag, it tells the tag the conditions that must be met for the tag to fire. When a tag ‘fires’, it enables its respective 3rd party tracking program to start tracking information. A tag must have at least one trigger in order to fire at all.
Once you’ve added a tag, you will be able to set your tag triggers. You’ll need to enter in a few details about the tag, then you can set the triggers (or the ‘rules’) for that tag.
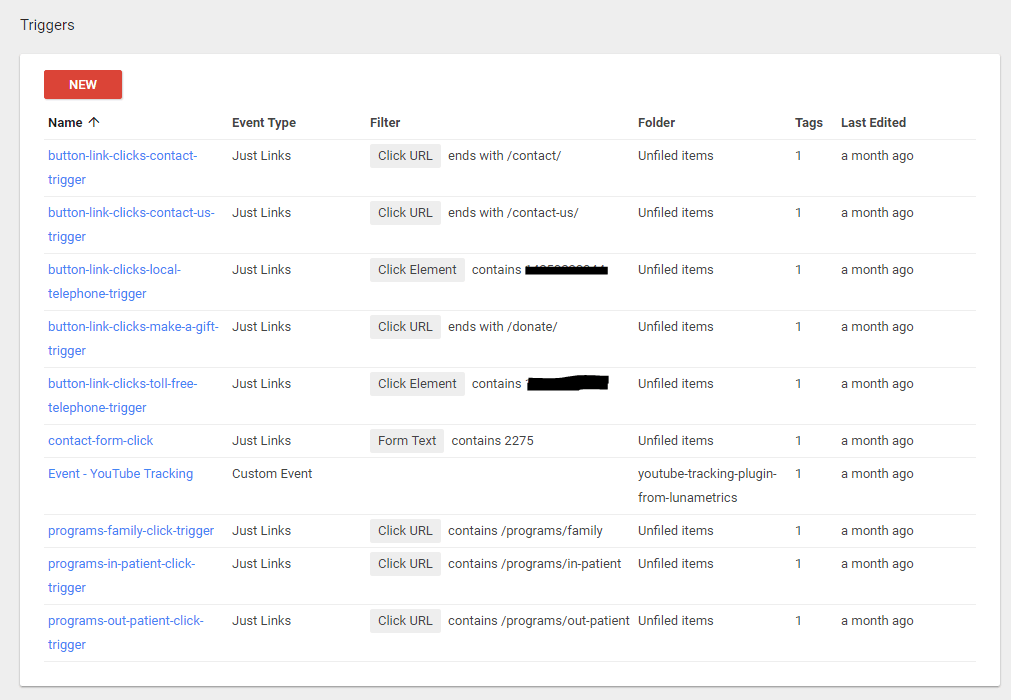
A trigger is composed of one or more filters. Each filter determines the conditions that must be met for a trigger to fire. To create a trigger, you must first define the variable, operator, and value of that trigger.

The simplest way to explain how these elements interact to is to give an example.
If a marketer wants a tag to fire when a visitor lands on the homepage, they would set up a trigger for that homepage. If the URL of the homepage ends in “/home” they would select URL as the variable, “contains” as the operator, and enter “/home” into the value.
When a visitor lands on the homepage, a site crawl would search the variable selected (in this case, the URL) to see if it contains (operator) the value (“/home”). If the conditions are true, the trigger will fire. If the conditions are false (if the URL does not contain the value, “/home”), the trigger will tell the tag not to fire.
Google Tag Manager has changed the landscape of analytics tracking and reporting by making measurement easier and more accessible for marketers. Being able to control 3rd party tracking programs from a centralized dashboard makes it easier to integrate new data tracking programs, measure relevant data, and pivot efficiently when needed.
Here’s what it looks like when you set up a trigger on Google Tag Manager:

This blog is an overview highlighting the capabilities and general components of Google Tag Manager. For a complete description of this program, we encourage you to read the official guide. If you’re interested in learning more about the capabilities of Google Tags, and/or integrating Google Tag Manager into your marketing strategy, reach out to learn more about how Fujisan Marketing can help.


